Reverting back to the Classic Editor in the latest edition of WordPress
One of the most ill-advised updates in WordPress history came this past week in the form of WordPress version 5.0. The latest iteration of the software has ditched the traditional, or “classic” editor we’re familiar with in lieu of a new “block style” layout editor named “Gutenberg”.
In short, Gutenberg replaces the previous classic editor which has existed within WordPress for over ten years. It’s a modern rethinking of the entire publishing interface, however, that’s not always a good thing.
After playing with Gutenberg for several months (as WordPress announced its arrival would come some time ago) I started seeing that some custom functions I developed for clients of mine had disappeared. On top of that, copy and pasting content from other sources, and then editing said content, had become laborious.
It appears I’m not alone in this thinking, as the official WordPress plugin repository tells the whole tale:
Gutenberg is the default editor in the latest version of WordPress and doesn’t have to be installed, so the 400,000 active installation statistic is a bit misleading. However, the over one million active installations for the Classic Editor is not: the number continues to climb by hundreds of thousands daily, as WordPress users and developers reject the new block layout style of Gutenberg (illustrated by the over 1,900 reviews, currently at 2-stars as of this writing).
If you’re one of those users stuck in a rut with the new editor, not all is lost. You can use one of the following two methods, outlined below, to restore the Classic Editor as a plugin. Doing so will also revert some of the elements Gutenberg hides or breaks in the latest edition of WordPress.
According to the official plugin repository:
Classic Editor is an official plugin maintained by the WordPress team that restores the previous (“classic”) WordPress editor and the “Edit Post” screen. It makes it possible to use plugins that extend that screen, add old-style meta boxes, or otherwise depend on the previous editor. By default, this plugin hides all functionality available in the new Block Editor (“Gutenberg”).
The official link also notes that support for the Classic Editor will be maintained until at least 2022: a good sign for those of us fighting with compatibility issues within it’s replacement.
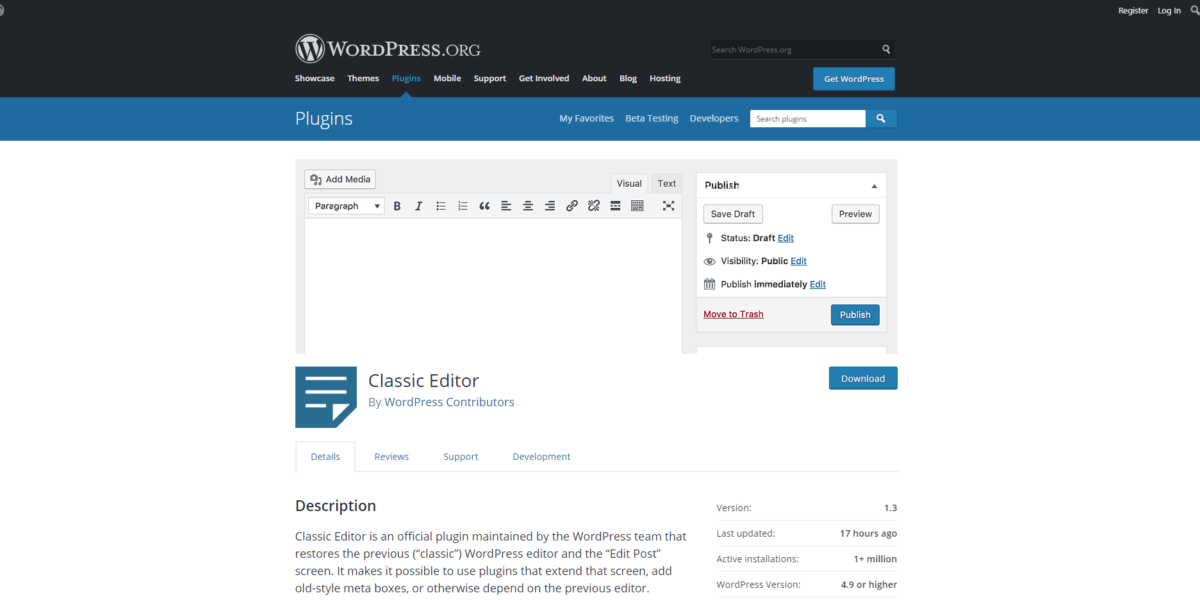
If this sounds like something you wanted yesterday, here’s how you can go back to the way things were by installing the official Classic Editor WordPress plugin.
Add New Plugin
If you click on the Plugins link on the sidebar menu within the WordPress admin area, you will arrive to a screen listing all of your installed plugins. A button at the top of the page gives you the ability to “Add New” and that’s precisely what we want to do. Clicking the “Add New” button will take you to the next screen, where you can directly install a plugin by searching for it, or you can upload a plugin you previously downloaded to your machine.
Direct Install
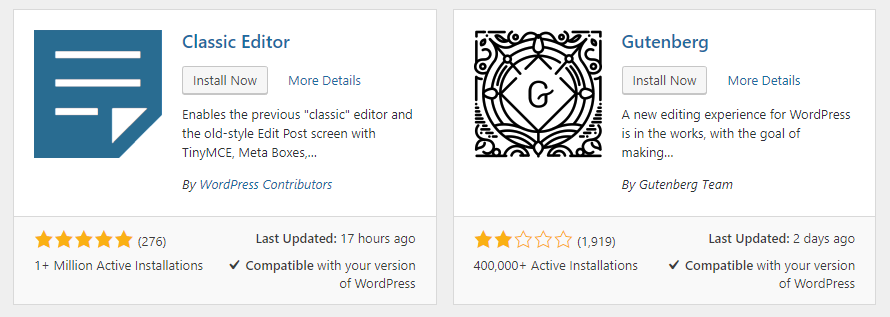
Currently, the Classic Editor is one of the most popular plugins in the WordPress repository and should show up on the main “add plugin” screen without searching for it. Should it not be on your screen here, a search box to the top right of the page will help you track it down.
Simply type in “Classic Editor” and you should see several search results. Look for the correct plugin (as pictured above) and click on the “Install Now” button.
In a few moments the plugin will install on your WordPress site, but you’re not finished yet: you must then click on the “Activate” button which takes the “Install Now” button’s place in order to apply changes and restore the Classic Editor over Gutenberg.
Upload Manually
If for some reason you cannot directly install the Classic Editor, another option is to download the Classic Editor as a zip file from the WordPress plugin repository. Start by downloading the file from this link: https://wordpress.org/plugins/classic-editor/.
Next, visit the same plugins section, as noted above, by clicking on the relevant “plugins” link on the sidebar while logged into the WordPress dashboard. You will arrive at the page listing all of your installed plugins. Just like the direct install method, you want to click on the “Add New” button at the top, but this time you will click on another button in nearly the same spot on the next page, “Upload Plugin” and then choose the zip file you saved from the step above.
In moments you will see that the plugin has installed and you will be given an option to activate it. Don’t forget to do this, as the inactive plugin won’t get rid of the Gutenberg “experience”!
Conclusion
It’s easy to see that WordPress users are initially rejecting Gutenberg due to the lack of a traditional word processing experience. Computer, and even smartphone users, have grown accustomed to a traditional toolbar and return lines (headers, paragraphs, etc.) as commonly found in programs such as Microsoft Word, social media apps, and just about any email provider or software on the planet.
The new Gutenberg experience attempts to make block layout easier for the Average Joe, as advanced web designs required knowledge of HTML and CSS in the past. However, Gutenberg makes this change by eliminating a traditional writing experience which has been around since the dawn of personal computing.
In addition, those of us (like myself) who have hand coded custom WordPress themes and functions for advanced designs, are finding that our work is broken by the Gutenberg editor: making it more difficult for users and clients to update their sites or breaking functionality altogether.
If you find yourself in either camp as someone who wants the classic writing layout or you can’t find custom meta boxes and features you once had while editing your website, then a return to the Classic Editor is just the fix you need to get right back on track!
Where to find royalty-free photos for your blog
Pictures make everything pretty: including your blog posts.
Adding a nice featured image to each post will decrease the chances of someone scrolling on by your post when you share your links to social media. However, you can’t just jump on the Internet and download any picture for your personal use. In fact, doing so may see you hit with legal action, including a stiff fine in the mail, if you happen to acquire a photo from a large stock photography house such as Getty Images or Corbis.
Of course, you could always sign up for a subscription to those large stock photography websites, but doing so could cost you a solid chunk of change.
When mentioning these drawbacks to others, I always get asked: “How do I find photos for my blog then?” Luckily, there are some free or low-cost ways to get around sinking a fortune into your content marketing campaigns.
Low-cost stock photo sites
If you’re willing to pay a little for quality photos, you may be surprised at what’s available for bloggers.
Sites such as Dreamstime, Shutterstock, and Bigstock offer lower-priced options than the bigger sites, but depending on your needs, those could still cost you in the long run. However, versus the free options listed below, you will see that the middle-tier stock photo sites offer higher quality photos with a larger selection. (It sounds cliché, but you get what you pay for sometimes.)
Pixabay
One of my go-to sites for free photos, Pixabay offers unlimited downloads of royalty-free photos. Most photos are licensed under a CC0 Creative Commons license, which means it’s free for commercial use with no attribution required.
Pexels
Pexels works in much the same way as Pixabay. In fact, you may see many of the same photos on both sites. Regardless, it’s nice to have more than one place to search in case you can’t find the right fit for what you’re looking for.
Unsplash
Unsplash releases new photos on a consistent basis. Their collection varies from that of the first two sites and offers high resolution (large) images from a number of reputable photographers.
Photo Pin
Rather than mess around with the various options within Google Images and hope you get a right-free image, use Photo Pin.
Their website scours the web for Creative Commons licensed images. Their search engine also helps you avoid perusing Flickr within the same way, saving you a lot of time in the process.
Death to Stock
I used to be an advocate of this website as it offered restriction-free photos for no cost. It was founded by a pair of photographers who would publish a monthly pack of images via their newsletter.
However, the clever “Death to Stock” name has turned them into a pricing model akin to the very sites they opposed. That’s the buyer beware, as you may find what you need here but there are now some strings attached.
Best of the rest
I wanted to give you a few more options below, but with a disclaimer: these sites can be cumbersome to use and shove a lot of ads in your way. Still, it never hurts to have more than one option when hunting for that perfect photo to accompany your blog post.
Why rushing to publish content isn’t advisable
In my line of work, I often see some dubious requests. Among those are to publish a blog post ASAP or worse yet, post several articles within a single day.
That wouldn’t be such a bad strategy for someone consistently producing content (think: newspaper). However, most of the clients I work with struggle to produce content even on a weekly or bi-weekly basis. Often, they’ll have a productive day where they write a new article full of advice or several similar smaller posts.
The reaction is almost always the same:
Publish these ASAP!
I usually question the motive. Sometimes you may be in a line of work where deadlines necessitate such a move. The piece in question should be brought out into the public eye as soon as possible.
Most of the time that’s not the case. Rushing to publish something at 5 pm, when everyone is leaving work, isn’t going to get it in front of more eyeballs than if you wait until the morning. In fact, if this is shared on social media (especially if you have automation tools which post it to Facebook or Twitter as soon as its published) you’re more than likely doing yourself a disservice based on the volatility of social media. Tweets disappear almost instantly. Facebook posts scatter around the ether.
The advantage of posting now soon become a disadvantage.
The same can be said for the day of the week you post on. You need to know your audience. For example, business blogs should focus on publishing between Monday and Friday. However, posting Friday afternoon probably isn’t advisable either, as most businesspeople are wrapping up their week. Monday mornings could also have the same disadvantage though, depending on the medium you are broadcasting your new article, it may get more play through that afternoon and into the coming days of the week.
I also have to hold back some overzealous types from wanting to publish and/or post four blogs in a single day. There is no advantage to that and it could be even worse than an ill-advised sports article posting while that team’s fans are watching them play a game! (Okay, that might be the worst scenario, but bear with me.) Should you make multiple posts in a single day, you’re making those individual articles compete for attention with one another. Worse, if your homepage and/or blog only show the last X number of posts, where X is 2 and you post 3 new articles, that means the third blog won’t be visible on those pages.
Even your most hardcore readers may not see that additional post.
Ditto for social media. On a medium where you’re already competing for eyeballs with other people or businesses posting information, there’s a negative benefit to blowing through all of your content at once.
The final and the most obvious problem with rushing to publish content is making errors. A small typo may not be the end of the world, but factual information such as math, dates, times, etc. could make all of the difference between positioning yourself as an expert and looking like you don’t know your subject matter.
Therefore, the optimal strategy with producing any content is to be consistent. It’s one of my mantras, but it holds true. It’s better to have a small stack of ready-to-go content that you can publish as a steady stream to your audience than burn through all of it in one fell swoop. Organizing your efforts and spreading them out over time will reap greater rewards than a “now” mentality.
I have several tools which I like to use to plan out when my content is published. You can find this on my resources page. In addition, you’ll also find tools to help you post to social media more efficiently. You can always re-post to social media in the future. As long as you’re not spamming your audience they may even revisit your blog post or podcast which they started but didn’t finish, or they may refer it to a friend.
In that way, you can put your eggs in different baskets, save yourself some time and stress, and set forth on a successful content marketing campaign.
“Picture perfect” images and graphics on Social Media
If you’ve ever heard the idiom “A picture is worth a thousand words” there is no truer sense of the word when associated with content marketing. The last thing you want is an image that doesn’t properly fit on your blog or looks out of place on social media.
There’s no doubt about it: photos and images help your content marketing efforts get attention. Much more attention!
That’s why it’s important to make sure you not only have photos on your blog posts, but that they are properly formatted to avoid some of the problems commonly seen when you share your links on social media. I’ll give some examples of those issues below and how you can avoid them.
The right image
Almost always, I try to avoid using any graphics with text on them. One of the chief reasons is that Facebook will charge you more when boosting your post… or worse, they will not allow you to use it as part of an advertising campaign.
Don’t ask me why, but that’s their rules. We have to play by them.
The other reason is to avoid having text “chopped off” when your link is shared. Therefore, you’ll notice that I refer to “photos” below, but this pertains to any graphic image. Less text is better: no text is best. Leave the typing to what you write in your blog or the description within your post.

It all starts with your blog
If your image isn’t properly formatted on your blog, then it won’t be properly formatted on the various social media networks you may share it on.
For those of you using WordPress, Facebook will traditionally look for the first image in your blog posts and associate it when sharing. Ditto for other platforms such as Twitter and Google Plus.
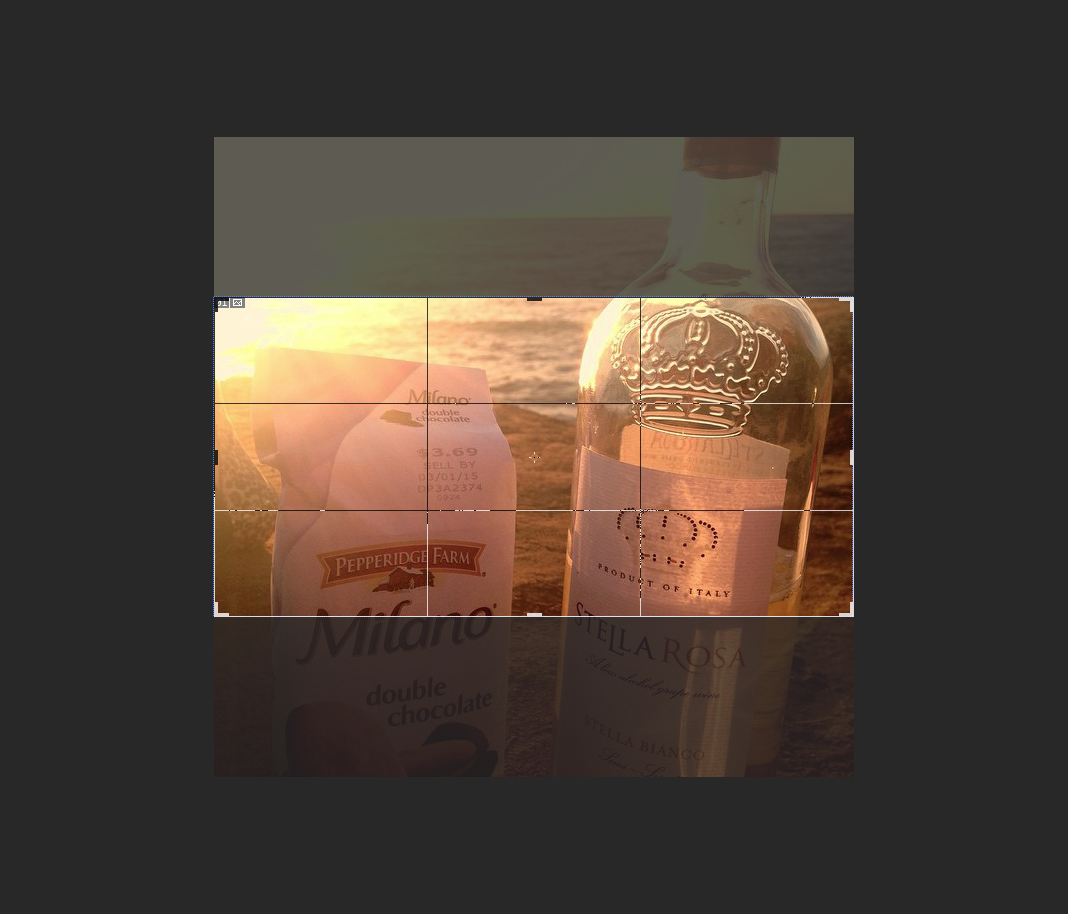
Therefore, it’s imperative that image is formatted correctly. I’ve found that a landscape-oriented image with a size of 1024px by 512px is the optimal size when sharing your posts across platforms. Facebook can handle any square image so long as it’s at least 600px wide on one side, however, Twitter will crop square images, particularly on their mobile applications.
There are many imaging programs which will allow you to crop your photos to this specific size. One popular option is Adobe Photoshop, which is a commercial application. For those on a budget, you can try open source or free programs such as GIMP, XnView or Microsoft Paint (or its newest incarnation, Paint 3D).
There is also a plethora of smartphone apps which can do the same: a simple search should be able to show you which ones are available. From there, it’s just a matter of personal preference as to which one is more user friendly and fits your needs.
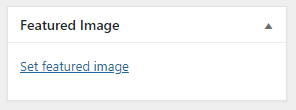
Once you have a 1024×512 image, its time to place the photo in your blog. For the 70% or more of you out there, chances are you’re using WordPress. That means you will have a featured image box from which to set the main graphic associated with your post.
That box is usually part of the sidebar and looks like this:
To help Facebook and Twitter know your featured image is the “main photo” to accompany your blog post, you can also install the Yoast SEO Plugin. Once activated simply double-check that Facebook Open Graph meta data and Twitter card meta data are both enabled under Yoast’s social settings section.
This is a one-time setting, so once you save the changes, all of your blog posts (past, present or future) will have those social meta tags included.
That’s it! Now you’re set to share your post. However, let’s look at what some of the downfalls of not using properly formatted images might look like.
Using small images
I probably see this more often than I should. With the advent of high definition computer and smartphone screens its as important as ever to not use tiny “postage stamp” sized images on your blog.
Or else, this is what will happen:
You will need images that have a good resolution but are not too big either. As you can see, this is far less eye-catching as when a properly formatted image is used:

(Note: while these examples are from Twitter this will appear similarly on Facebook too.)
Also keep in mind: bigger doesn’t always mean better.
The reason I recommend images sized 1024px in width is that embedding large images on your website will slow it down. When your page load speed decreases, your SEO will be penalized. It’s a careful balance as you want to be found by Google and look good on social media.
WordPress can only handle certain sized images internally too. If you upload an image that’s too big, it may get rejected or worse, crash your website. So be careful in making sure you format your images before uploading them to your blog.
Avoid Text
This post not only ignores the size of the image but also fails to consider text being cropped:
There’s no benefit to adding wording to your images if they are featured images for your blog. A post or banner added to a social media post promoting an event without a link, of course, is acceptable. It may still be governed by the same rules as sharing links, but in many cases an event flyer or poster is a necessary evil to share. (Just be aware of how cropped images could make your presence look less than professional.)
In any other situation you should attempt to put necessary text within the description of the social media post followed by the shared URL. In this way, your message won’t get truncated.
The Wrong Format
Nothing could be more embarrassing than having someone’s head chopped off in a photo:
While this may still happen on some devices even with the recommended 1024×512 image size, your chances are greater that it will not.
Therefore, heed my advice throughout this article in optimizing your images before putting them on your blog or sharing them on social media.
Why every website on Earth needs a blog
This may sound like a bold claim, but I’m of the firm belief that every website must have a blog.
Blogs may not always have positive idea behind them, but you’d be hard-pressed to find anyone online that doesn’t believe they have merit. With a blog, you can express your opinions, promote products or services, position yourself as an expert, establish yourself as an expert or connect with others like you.
It can literally be a kitchen sink for updates too. If you have a press release, new news, an upcoming event, answer a question or simply want to get something off your chest, a blog can house all of these types of articles and then some.
Blog can also be a way to have fun, stay updated within a certain field (by doing research as part of your writing) or best of all, a blog could end up making you money.
The last part is important, but not to be taken for granted. Soliciting enough clicks to visit your website may be too big of a battle to quit your day job, but you can never say never. Internet personality Gary Vaynerchuk started as a wine critic before ascending to viral fame. But even if that type of celebrity isn’t in the cards for you, at the very least you may increase your footprint to make people aware of yourself, you brand and/or your products and services.
That alone may lead to more leads, and sales, than you would’ve had without a blog.
Which leads me (pun intended) to the biggest benefit I feel anyone can gain from blogging: leading people back to your website.
Hopefully you have a well-built website which puts calls to action and sales pitches front-and-center. Visitors to your site may feel compelled to look around and see what you have, all because a well-crafted blog post brought them there.
In closing, don’t discount the benefits of having a blog. Oftentimes, the ability to start a blog (if you don’t already have one) is only a few clicks away. Coming up with topics may not be difficult and in the end, you can begin generating a buzz about yourself by simply typing away as you would on Facebook or a text message.
A few minutes of blogging a week can lead to great results down the road.
So why do you need a blog? Maybe the better question is why would someone not need one?!